How to Tie a Tie: 8 Classic Knots Every Man Should Know

A tie knot is chosen based on three factors: the width and thickness of the tie fabric, the spread of the shirt collar, and the formality of the occasion.
There is no single “correct” knot — there is a correct knot for the collar and fabric in front of you, and a well-dressed man knows several so he’s never limited by what’s in his closet.

This guide covers eight knots every man should be able to tie from memory: four essential, everyday knots and four specialty knots worth knowing for specific collars and occasions.
Each comes with numbered steps, an approximate difficulty and symmetry rating, and guidance on when to use it.
Quick Rules: Tie Knots at a Glance
- Match knot size to collar spread. Narrow, close-set collars need small knots (Four-in-Hand, Kelvin); wide, spread collars need larger, more symmetrical knots (Windsor, Balthus).
- Match knot size to fabric thickness. Thick wool or heavy silk ties need smaller knots to avoid bulk; thin silk or lightweight ties can support larger, more structured knots.
- The Four-in-Hand and Half-Windsor cover roughly 90% of situations and should be the first two knots any man learns.
- The Full Windsor is for the most formal, widest-spread-collar occasions — it is often over-tied by men whose collars and fabric don’t call for it.
- The dimple below the knot is not optional. A properly tied knot always has a visible dimple, created by pinching the fabric just below the knot as it’s tightened.
- The tie’s tip should reach the top of the belt buckle, regardless of which knot is used — knot choice affects width and shape, not final length.
1. The Four-in-Hand Knot
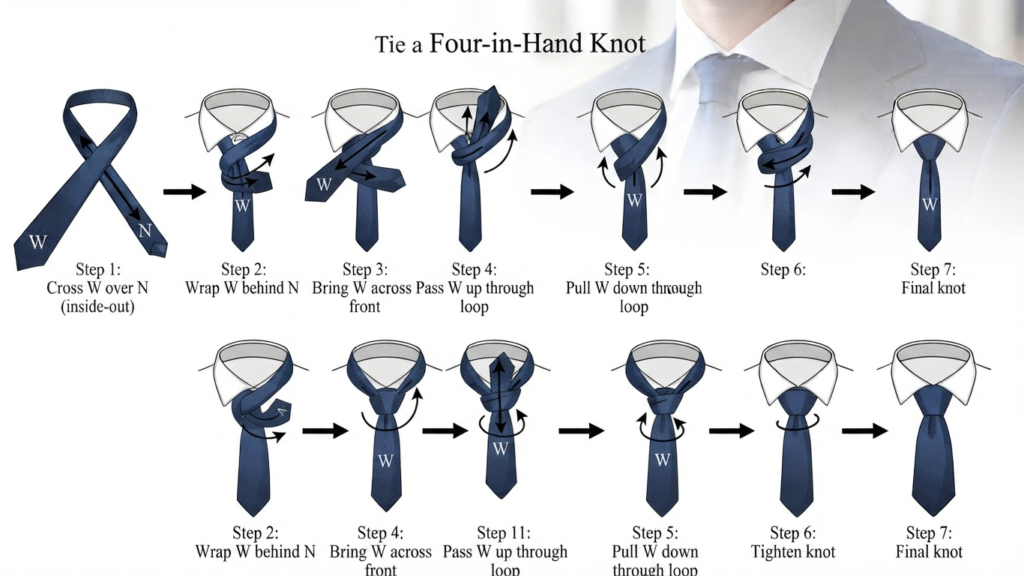
The Four-in-Hand is the oldest and most widely used necktie knot, and the correct default for the majority of shirts and ties. It is narrow, slightly asymmetrical, and produces a long, tapered shape that works with almost any collar type, especially narrow or semi-spread collars.
Steps:

- Drape the tie around your neck with the wide end (blade) on your right, extending roughly 12 inches lower than the narrow end (tail) on your left.
- Cross the wide end over the narrow end, so it now hangs on your left.
- Bring the wide end back underneath the narrow end, moving right to left, then up and over the front again to the right.
- Pass the wide end up through the neck loop from underneath.
- Bring the wide end down through the front loop you’ve just created.
- Hold the narrow end and slide the knot up snugly toward the collar, using your other hand to pinch a dimple just below the knot as you tighten.
Best for: Narrow and semi-spread collars, everyday business wear, thicker or textured fabrics that would look bulky in a larger knot.
2. The Half-Windsor Knot
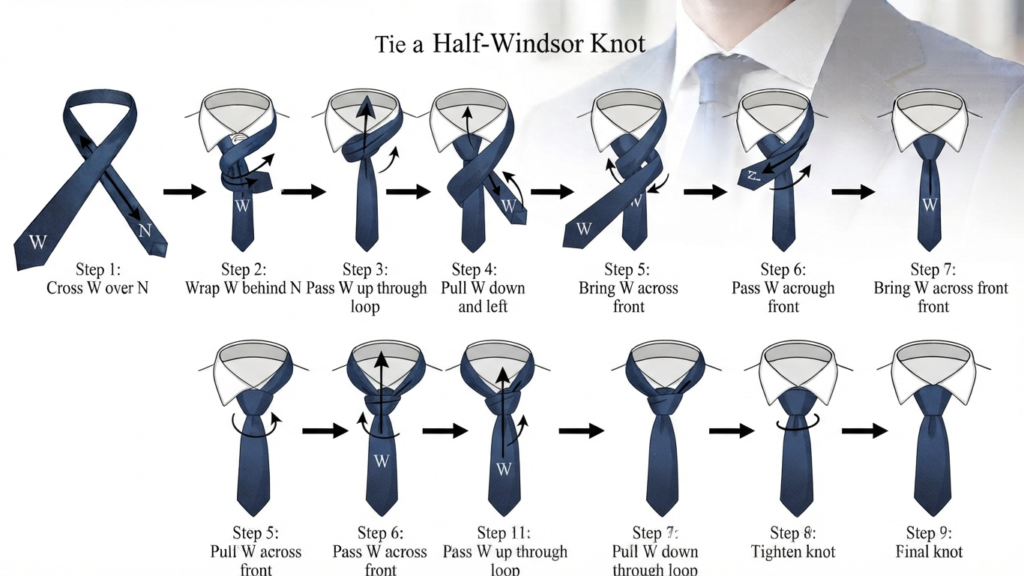
The Half-Windsor is a triangular, moderately sized, symmetrical knot — more structured than the Four-in-Hand but less bulky than the Full Windsor. It is the most versatile “step-up” knot and works well with the majority of modern collar styles.
Steps:
- Drape the tie with the wide end on your right, extending about 12 inches below the narrow end.
- Cross the wide end over the narrow end to the left.
- Bring the wide end up and through the neck loop, then pull it down to the front.
- Pass the wide end around behind the narrow end again, moving left to right.
- Bring the wide end up through the neck loop a second time from underneath.
- Pull the wide end down through the front loop that has just formed.
- Tighten by holding the narrow end and sliding the knot up, pinching a dimple as you go.
Best for: Semi-spread and moderate spread collars, business and formal occasions, medium-weight silk ties.
3. The Full Windsor Knot
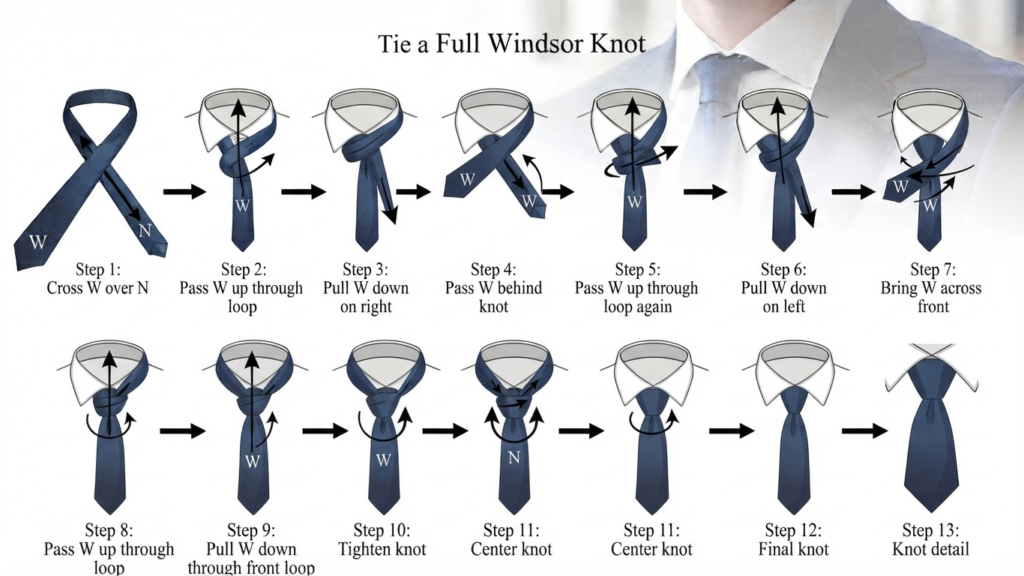
The Full Windsor (also called simply the Windsor knot) produces a large, wide, highly symmetrical triangular knot. It was popularized in the mid-20th century and remains the standard choice for the most formal business and ceremonial occasions, provided the collar spread is wide enough to accommodate its size.
Steps:
- Drape the tie with the wide end on your right, extending about 12 inches below the narrow end.
- Cross the wide end over the narrow end to the left, then bring it up through the neck loop and pull down to the front, to the left side.
- Take the wide end back across to the right, passing it behind the narrow end.
- Bring the wide end up through the neck loop again from underneath, then let it hang down at the front, on the right.
- Cross the wide end over the front horizontally, moving right to left.
- Bring the wide end up through the neck loop one final time from underneath.
- Pull the wide end down through the front knot that has formed.
- Tighten symmetrically by holding the narrow end and sliding the knot upward, pinching a dimple as it sets.
Best for: Wide-spread and cutaway collars, formal business meetings, weddings, and other high-formality occasions. Avoid with thick fabrics or narrow collars, where the knot will look oversized.
4. The Pratt Knot (Shelby Knot)
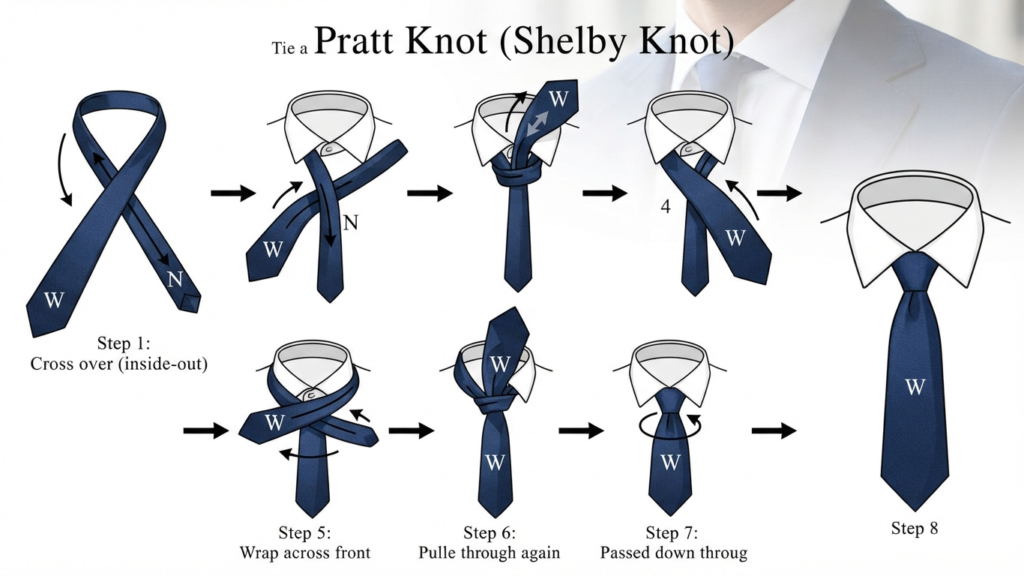
The Pratt Knot, also known as the Shelby Knot, is unusual among common knots because it begins with the tie’s lining side facing out rather than the printed side. The result is a neat, symmetrical, medium-sized knot that sits slightly narrower than the Half-Windsor — a good middle-ground option for men who want more structure than the Four-in-Hand without the bulk of a full Windsor.
Steps:
- Drape the tie around your neck with the lining (back) side facing outward, wide end on the right, extending about 12 inches below the narrow end.
- Cross the wide end over the narrow end to the left.
- Bring the wide end up through the neck loop from underneath, then let it fall back down to the front, now with the printed side facing out.
- Cross the wide end over the front to the left.
- Bring the wide end up through the neck loop a second time from underneath.
- Pull the wide end down through the front loop that has formed.
- Tighten by holding the narrow end and sliding the knot up, pinching a dimple as it sets.
Best for: Semi-spread and spread collars, business settings, medium-weight ties where a Half-Windsor feels slightly too large.
5. The Kelvin Knot
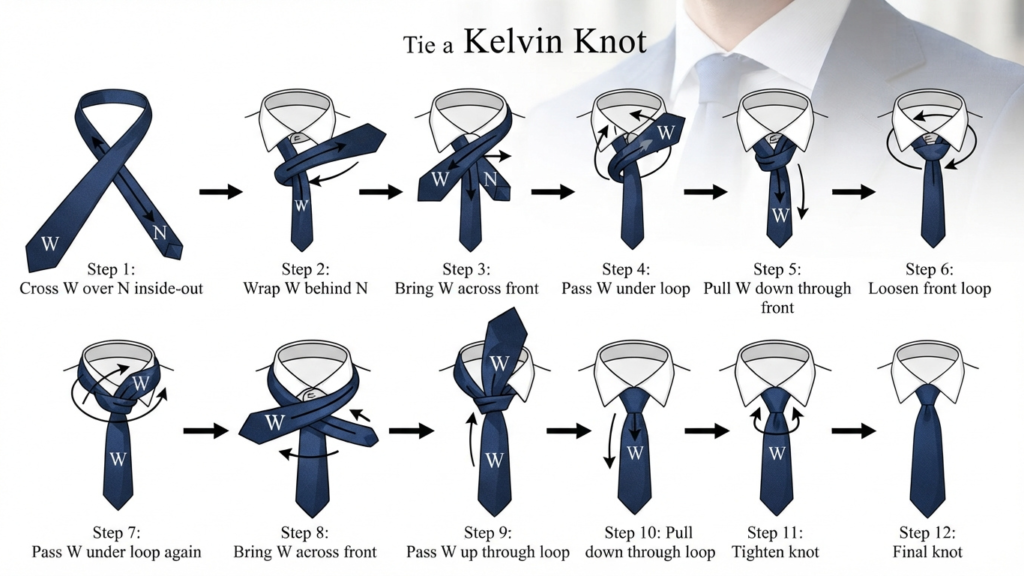
The Kelvin Knot is a compact, narrow, slightly asymmetrical knot — one of the smallest structured knots available, similar in scale to the Four-in-Hand but flatter and more triangular. It is well suited to slim ties and modern narrow-collar shirts.
Steps:
- Drape the tie with the wide end on your right, extending about 8 to 10 inches below the narrow end (less length is needed than for larger knots).
- Cross the wide end over the narrow end to the left.
- Bring the wide end underneath the narrow end and back across to the right.
- Bring the wide end up through the neck loop from underneath.
- Pull the wide end down through the front loop that has formed.
- Tighten by holding the narrow end and sliding the knot up snugly, pinching a dimple as it sets.
Best for: Slim and skinny ties, narrow point collars, business casual settings where a smaller knot is preferred.
Read also: How to Dress Like a Gentleman: Timeless Style Rules
6. The Nicky Knot
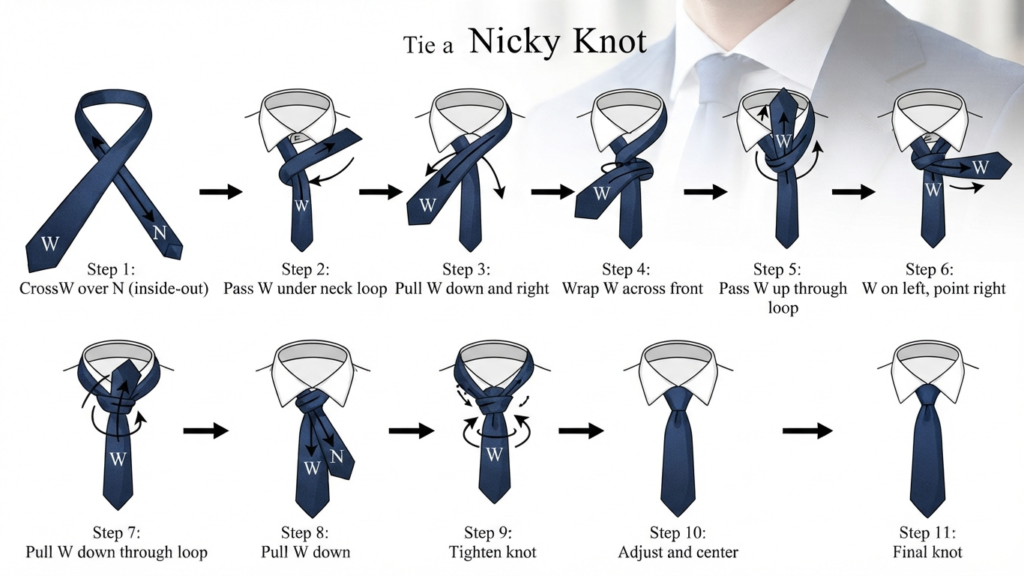
The Nicky Knot is a compact variation of the Four-in-Hand with an added wrap that gives it slightly more symmetry and a marginally larger profile, while remaining narrow enough for slim ties and close collars.
Steps:
- Drape the tie with the wide end on your right, extending roughly 12 inches below the narrow end.
- Cross the wide end over the narrow end to the left.
- Bring the wide end underneath and back across to the right, then up and over the front again to the left.
- Pass the wide end up through the neck loop from underneath.
- Bring the wide end down through the front loop.
- Tighten by holding the narrow end and sliding the knot up, pinching a dimple as it sets.
Best for: Narrow collars, slim ties, everyday business wear where a slightly more structured alternative to the Four-in-Hand is wanted.
7. The Prince Albert Knot
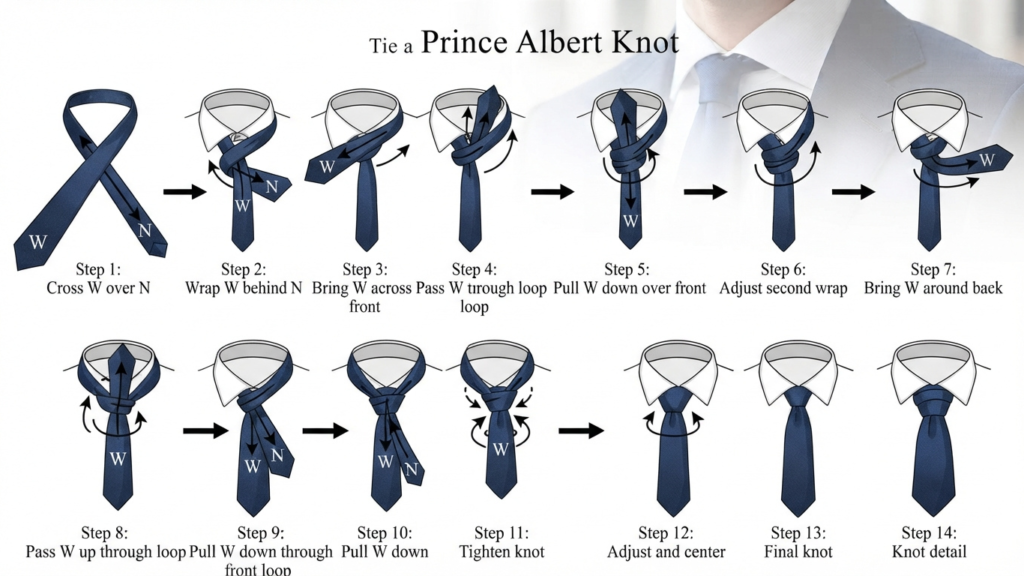
The Prince Albert Knot is a variation on the Four-in-Hand with an extra pass around the front, giving it a longer, narrower, and slightly more layered appearance. It has a subtle textured look at the front of the knot due to the additional wrap.
Steps:
- Drape the tie with the wide end on your right, extending about 12 inches below the narrow end.
- Cross the wide end over the narrow end to the left, then bring it back underneath to the right.
- Repeat the same wrap a second time — over to the left, then underneath back to the right — so the wide end has wrapped around the narrow end twice.
- Bring the wide end up through the neck loop from underneath.
- Pull the wide end down through the front loop that has formed.
- Tighten by holding the narrow end and sliding the knot up, pinching a dimple as it sets.
Best for: Narrow and semi-spread collars, lightweight silk ties, men who want a variation on the Four-in-Hand with slightly more visual texture.
8. The Balthus Knot
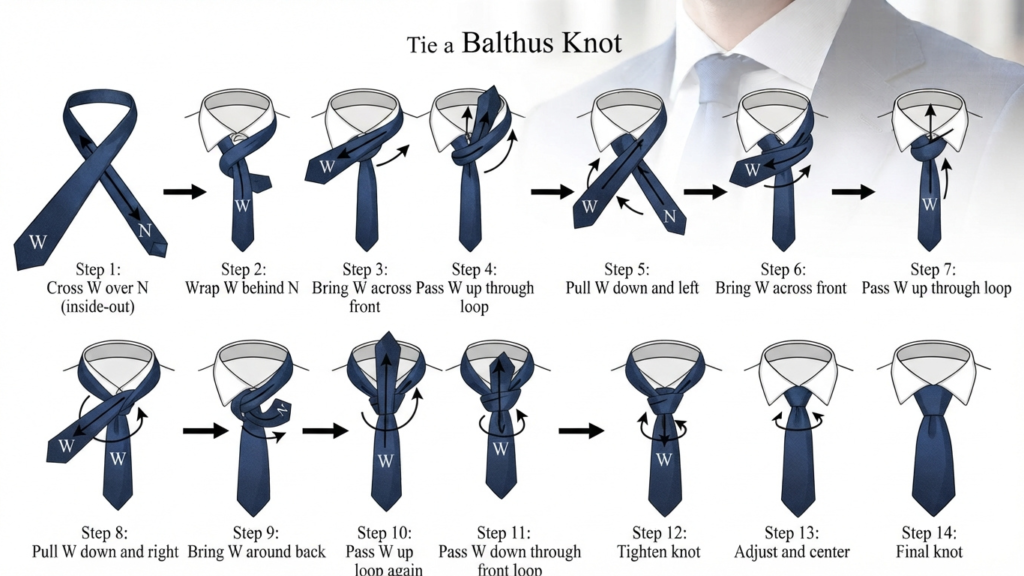
The Balthus Knot is the largest and most formal structured knot in common use, even wider than the Full Windsor. Named after the painter who reportedly favored it, this knot requires a long tie, a thin fabric, and a wide-spread or cutaway collar to look proportionate — it is a specialty knot rather than an everyday choice.
Steps:
- Drape the tie with the wide end on your right, extending significantly further down than usual — this knot consumes more length than any other on this list.
- Cross the wide end over the narrow end to the left, then bring it up through the neck loop and down to the front on the left side.
- Bring the wide end across the front horizontally to the right.
- Pass the wide end up through the neck loop from underneath, then down to the front on the right side.
- Cross the wide end over the front again, moving right to left.
- Bring the wide end up through the neck loop one more time from underneath.
- Pull the wide end down through the front knot that has formed.
- Tighten carefully, keeping the knot symmetrical and wide, pinching a dimple as it sets.
Best for: Wide-spread and cutaway collars only, formal and ceremonial occasions, thin silk ties with enough length to spare. Not recommended for shorter ties, since this knot uses more fabric than any other on this list.
Common Mistakes to Avoid
- Choosing a knot that’s too large for the collar, leaving no visible gap between the knot and the collar points, or too small for a wide-spread collar, leaving the collar gaping open.
- Skipping the dimple. A tie without a dimple below the knot looks unfinished regardless of which knot was used.
- Uneven tie length, with the tip falling well above or below the belt buckle. Adjust the starting drape length before tying, not after.
- Over-tightening or under-tightening the knot, resulting in either a knot that looks strangled and misshapen or one that looks loose and sloppy.
- Using a bulky knot with a heavy fabric, producing an oversized, lopsided result — match knot size to fabric weight, not just personal preference.
- Tying the same knot regardless of collar type, rather than adjusting knot choice to the shirt being worn that day.
Frequently Asked Questions
Is the Full Windsor knot outdated? No, but it is frequently misused. The Full Windsor remains appropriate and expected for the most formal occasions and widest collar spreads. It is considered a mistake, however, when tied with narrow collars or thick fabrics, where its size becomes disproportionate rather than formal.
What’s the difference between the Windsor and Half-Windsor knots? The Full Windsor uses one additional wrap around the collar compared to the Half-Windsor, producing a larger, more symmetrical, and more formal-looking knot. The Half-Windsor is smaller and slightly less symmetrical, making it more versatile across a wider range of collar spreads and occasions.
Which knot should a beginner learn first? The Four-in-Hand is the standard starting point, since it works with the widest range of collars and fabrics and requires the fewest steps to tie correctly. The Half-Windsor is typically the second knot learned, covering the more formal occasions the Four-in-Hand doesn’t fully suit.
Does tie knot choice depend on the shirt collar? Yes, directly. Narrow and semi-spread collars pair best with smaller knots like the Four-in-Hand, Kelvin, or Nicky. Wide-spread and cutaway collars require larger, more symmetrical knots like the Half-Windsor, Full Windsor, or Balthus to fill the collar opening correctly.
How long should a tie be once tied? Regardless of knot choice, the tip of the tie should reach the top of the belt buckle. Knot choice affects the width and shape of the knot but requires adjusting the initial drape length (how far the wide end hangs below the narrow end before tying) to hit this same target length.
Read also: